Friday, December 2, 2011

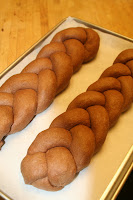
Chocolate Covered Cherries Braid

Don't know why I'm thinking chocolate today.  Maybe it's because I'm trying to diet . . . again.  And someone offered me a Tootsie Roll today thinking that would take care of the chocolate craving I was experiencing.  I'm sorry.  Sweet thought.  Not chocolate.

So I've never tried chocolate bread before.  But I think we just might have a winner.  My mom always loved chocolate covered cherries at Christmas and I just happened to have some dried cherries in my pantry.  It just all sounded too good not to try.

The 2 Loaf Recipe . . .

2 cups warm milk (about 140 degees)
1/2 c. melted butter
1/2 c. greek yogurt (I used non-fat)
2 beaten eggs
3/4 c. honey
1 1/2 Tbsp. yeast
2 tsp. vanilla
1/2 c. cocoa
1/4 c. gluten
2 tsp. salt
8-10 cups whole grain flour (about 6 cups grain before milling)
6 oz. bittersweet chocolate chips (I used Ghiradelli)
1/2 c. dried cherries

Chocolate Glaze:
2 Tbsp butter
2 ounces unsweetened chocolate
1 cup sifted powdered sugar
(add more powdered sugar or milk to thin or thicken as needed)

First, pour wet ingredients into bowl.  Add about 4 cups of the flour and yeast.  Stir.  Cover and let sponge about 15 minutes or until dough has bubbled up about double in volume.

While your dough is sponging, reconstitute your cherries by soaking in hot water.

To the dough, add vanilla, cocoa, gluten & salt.  Begin adding flour until dough clears the side of the bowl.  Knead for 6-8 minutes, then check for gluten development with window pane test.

And this is where we begin . . . one big beautiful brown plump of chocolate dough.

Divide into two parts.  Cover the dough you're not working with under a big bowl to keep it from drying out.

Divide 1st portion into 3 parts.

Roll each section out into a long rectangle about 5 x 15".

Sprinkle 1 oz. of chocolate bits down the center as well as some of the re-hydrated cherries.


Roll up into one long log, making sure to crimp the edges tight to seal.

Repeat with other two parts.


Braid the three chocolate logs together into one beautiful braid.  Tuck the ends.


You can drizzle the glaze on the entire loaf or you can just leave the glaze in a bowl to be drizzled on separate slices.  This bread is also great  just left unglazed & toasted or warmed with morning coffee.


Tuesday, November 22, 2011

Whole Grain Bread with Pumpkin

I've made bread with pumpkin in the past and used it as cinnamon rolls.  But thought I'd try something a little different this year.  I will tell you, once I made my first batch, I was hooked.  The pumpkin makes for a very moist and soft bread.

Bread with Pumpkin
makes 2 loaves


8 cups freshly ground flour (I used Kamut, but Prairie Gold is good too)
1 15 oz. can pumpkin, plus water to make 3 cups
1/4 c. oil
1/2 c. honey (makes a little sweeter dough :-)
1/4 c. gluten
2 Tablespoons yeast
2 1/2 tsp. salt
zest of one orange
1 tsp. cinnamon
1/2 tsp. ginger
1/2 tsp. nutmeg
1/2 tsp. mace

(or you could just use pumpkin pie spice)

Mix the water and pumpkin together in a microwave safe bowl.  Heat for a minute then check temperature with thermometer.  You want to heat the pumpkin/water mixture to 130 degrees.  Once it has come to temperature, add oil, honey, about 3 cups of the flour and yeast.  Let it sponge for about 15 minutes, then begin to add remaining ingredients in your mixture.  Add only enough flour til the dough begins to pull away from the side of the bowl.  Knead for 5-8 minutes, testing dough with window pane test for gluten development.

Then this is what you get . . . beautiful pumpkin orange dough!


At this point, you could just make 32 rolls.  And they are super scrumptious!  The spices are mild and not overpowering at all.  These will go perfect with your Thanksgiving Turkey.


Or . . . you could make the most beautiful Huge Cinnamon Roll with a Gooey Caramel Glaze


And here's how you do it:
With half of your pumpkin dough, divide this in half as well.  Roll out 1st half to about 12x16.  Brush with soft butter, then dust with some brown sugar and cinnamon.  Using a pizza cutter, cut this rectangle into 4 strips, then begin rolling.  Once you finish the first strip, take that roll and continue rolling the next strip around the first and so on until all four strips have been rolled into one big roll.


And now . . . do it again with the other half.  In the end you will have 8 16" strips of dough all wrapped up into one big cinnamon roll.


Let it rise for about 20 minutes, then bake for about 30 minutes or until temperature reaches 180-190 degrees.

For a super yummy glaze, in a saucepan melt 1/4 c. butter, then add 1/2 c. brown sugar & 2 Tablespoons heavy cream.  Cook to a boil.  Add chopped pecans if you like.  Then pour on top of warm cinnamon roll.


AND WITH THE 2ND HALF OF YOUR DOUGH,

You could try this Cranberry Cream Cheese Braid

Here's how you do it . . .

In a mixer, blend 1 8 oz. package cream cheese, 1/2 c. sugar & 1 egg

Divide remaining dough into three parts.  Roll out one section into one long rectangle, probably 20" x 4".


Sprinkle dried cranberries down the middle and press into dough.  Then spread about 1/3 of cream cheese mixture down center of dough.  Roll up long ways making one long snake.  Be sure and crimp the edges.


Repeat with the 2 remaining sections of dough.  Then begin to braid the 3 little snakes together.


Once the braid is complete, lay it into a round baking dish or on a cookie sheet.  Bake at 350 for about 30 minutes or until internal temperature is 350 degrees.  Cool for about 1/2 an hour so the filling sets up a bit.

Then . . . ENJOY!


Thursday, November 17, 2011

Blueberry Lemon Cheese Braid

Blueberries and Lemons!  Two of my very favorite flavors.  Putting them together, you can't go wrong.  But when you combine them both with cream cheese . . . Pure Heaven!

I think one of my very favorite places on earth is probably a place called Hatcher's Pass.  It's a little mountain pass not very far from Wasilla, Alaska.  We lived in the beautiful little town of Wasilla for 11years.  If you visit on one of the sea/land packages in the summer, you will pass through Wasilla on your way to Denali National Park, but you'll miss Hatchers.  Ask a local how to get there.  You'll be glad you did!  In the winter, we would drive up to Hatchers and take the kids sledding.  We'd drive a van full of kids up there, take them to the top of the trail, drop them off, then meet them at the bottom, then start all over again.  This kind of sledding is great--no hiking up and down, just speed!  The kids loved it, even when they crashed!

In the summer, however, there are a zillion beautiful trails to hike.  But in late August, it's all about the blueberries.  There are many places in Alaska to pick wild blueberries.  And if you find your perfect spot, it's kinda like a fisherman's perfect fishing hole.  You know the story . . . Where'd you catch those fish?  "In the river".  Where'd you find so many berries . . . "on the mountain".  I have so many memories with family and good friends picking up in Hatcher Pass.  The berries there are really indescribable if all you've ever had are pitiful grocery store blueberries.  They are the perfect mix of sweet and tart as well as the most perfect "bite", not at all mushy or mealy like those big beautiful deceptive grocery store berries.  (Can you tell I'm a berry snob?)

So we visit every summer now.  Always in August.  Because in August, you get to fish for silver salmon and you get to pick Blueberries.  I always bring back a few gallons.  I would bring more, but my family grows tired of blue fingers after a few days of picking.

The recipe:
about 26 ounces of dough, the equivalent of one loaf of bread
8 oz. cream cheese
3/4 c. sugar
zest of one lemon
1 egg
3/4 cup fresh or frozen blueberries
3/4 cup jarred or homemade lemon curd

Cream together the cream cheese and sugar.  Add the egg and lemon zest and blend well.  Gently stir in the blueberries.

To make the braid, just roll out the dough, about 26 ounces into a long skinny strip, probably around 18-20 inches.  Spoon the cream cheese mixture down the middle.  Drizzle the lemon curd down the middle, then swirl with a knife.  Cut slits down the sides of the dough, as pictured.


Begin your braid at the top, criss-crossing from left to right.


Once you've finished the braid, gently move to a round baking sheet.  If I had been super industrious tonight, I would have made a little bow to make it look gathered at the bottom.  Maybe on my next attempt, I'll do this.

Let your braid rise for about 20 minutes in a warm oven.  Then bake at 350 for about 30 minutes or until nicely browned.

And Voilah!  I was a little aggressive with the cream cheese filling.  As you can see, it's bursting from the seams.  But you want to try it, don't you?  Once it cools a little, I will add a lemon glaze.  For the perfect glaze, just mix 1 cup of powdered sugar with the juice of one lemon.


Wednesday, October 26, 2011

Bread Classes

Join me on either of two Saturdays, November 5 or 12 for a Whole Grain Bread Class.  We will use the Bosch Mixer and Nutrimill to create an amazing array of whole grain goodies!  We might even figure out how to incorporate a little pumpkin into something Ü.

Class cost is $10/adults, $5 students.  Drop me an email at ljgreenstreet@gmail.com if interested.

Monday, September 26, 2011

Oatmeal Bread

My mom is always telling me how good her bread is when she adds oatmeal.  Well I finally tried it!  And now I think EVERYONE should try it.  The loaves came out so soft and even had a little more rise to them than my normal batches.

What I did: 
To the basic bread recipe, I substituted 3 cups of rolled oats (not the quick kind) for some of the whole wheat flour.  I left everything else the same.  If you want your bread to really say "I'm oatmeal bread", just brush a little egg whites on top and sprinkle on some oats once you've made your loaves.

Give it a try!

Fall Orders Due!

I will be submitting my order in to Wheat Montana on Wednesday Sept. 28, so if you're needing anything before next April, get those orders in ASAP!

Friday, June 24, 2011

Whole Grain Sourdough Bread

In my bread class this past Saturday, I whipped up a loaf of Sourdough Bread using 100% spelt.  There were lots of questions on how to start a sourdough starter.  Here's a recipe that looks pretty simple.  I have not tried it, but it comes from a friend who works with Lequip.  Coming from her, I'm sure it works!  You can find lots of recipes on her website . . . http://www.cookingwithlacey.com/.

Starter:

•1/2 C Filtered Water
•1/2 C Fresh ground Wheat or Rye flour

Day 1 -- Place in a glass jar, combine the two together using a fork till no lumps are left. Cover the jar tightly with plastic wrap and cut a slit in the top. Stir every 12 hours.

Day 2 -- Feed the starter by adding a 1/4 more of each ingredient. Stir and cover again. Stir every 12 hours

Day 3-Day7 -- Feed the starter by adding a 1/4 more of each ingredient. Stir and cover again. Stir every 12 hours. By this day your starter should start to be bubbly and be picking up a sour smell. It will usually take 4-7 days for a good starter.

Once your starter is finished place a tight lid on your jar and place in the refrigerator. Feed weekly by taking 1 C starter and throwing it out ( I make something out of it each week) and feeding it with 1C flour 1C water. Let rest on counter till starter becomes active and bubbly again, place back in refrigerator.

Whole Grain Sourdough Bread


1 1/2 cups water
1 1/2 tsp. salt
3 Tbs honey or 2 Tbs agave
1/4 cup sourdough starter
5 cups whole grain flour


First mix together wet ingredients, then add salt and flour a little at a time.  Cover with plastic wrap and let sit for one hour.  Every 15 minutes, 3-4 times, uncover dough and scrape with spatula to remove from bowl.  Use a little flour on dough and on your hands as dough will be moist.  Pull the dough and fold back on itself 3 times, then place back in bowl and cover.

Let sit in a warm spot (like a microwave) overnight. 

Next morning, scrape dough from bowl, stretch and fold once more and place (seam side up) in a well floured basket.  You can buy actual "proofing baskets", or you can find one from around the house that is clean and you don't mind getting flour on.  It should be the same shape as what you will bake your bread in.  Let this rise for 1 1/2 hours.

I bake my bread in a clay baker, but I've heard you can use a dutch oven as well.  If you are only using your clay baker for bread, you won't need to oil it.  I would imagine with a dutch oven, you should put a little something on it.   Put your baker in the over and begin to preheat about 45 minutes before you will be baking the bread. 
When dough is through rising, quickly flip into baker and put into oven.  It should take 30-40 minutes.  Use an instand read thermometer to make sure it has reached 190-200 degrees.  Let cool for about 5 minutes then invert onto cooling rack.

Sunday, June 19, 2011

Peanut Butter Chocolate Chip Cookies

This is a super easy cookie recipe that I like to share with my classes and they're always a hit!  It really shows how you can incorporate whole grains into just about anything.  And with the use of natural peanut butter, rolled oats and whole grains, it's super good for you too!  In moderation, of course Ü.

1/2 cup butter
1/2 cup peanut butter (chunky or smooth--to your liking)--I like to use the natural PB, but Jif or Skippy work fine too
1 egg
1/2 cup sugar
1/3 cup brown sugar
1 cup whole wheat flour (Prairie Gold or soft white)
1/2 cup rolled oats (not the instant kind)
1 tsp. baking powder
1/4 tsp. salt
1 tsp. vanilla
1 cup chocolate chips

With mixer, cream together butter & peanut butter.  Add egg and sugars, mixing well.  Add dry ingredients and vanilla, then incorporate chocolate chips.  Use cookie scooper to make about 2 1/2 dozen cookies.  Bake at 350 for 10-12 minutes.

Monday, June 13, 2011

Bread Class!

JINKS’ YUMMY BREAD CLASS!


Saturday June 18

11 a.m. – 1 p.m.

Please join us as we learn the art of whole grain bread making from grinding the wheat to kneading and baking. We will use our Nutrimill and Bosch mixer to throw together in 2 hours not only a loaf of delicious whole grain bread, but also a fancy cinnamon swirl loaf, some burger buns, and a yummy lunch treat.

Cost - $10, students $5

If you decide to purchase a machine your class price will be applied to that.

Email me at ljgreenstreet@gmail.com to get your name on the list--Space is limited to the 1st 10 that sign up!!